Background Removal vs. Object Removal: What to Use When
Learn when to remove an entire background and when to erase one unwanted object while preserving the surrounding scene, with practical examples and a safe workflow.
 ImageWise Team
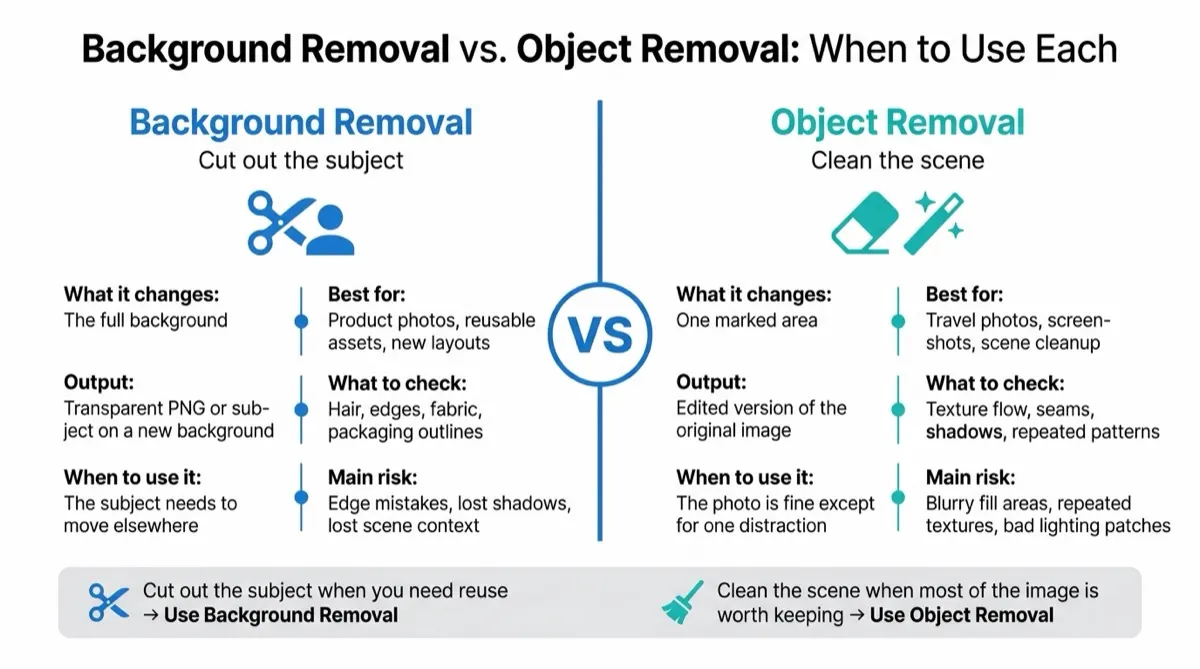
Background removal and object removal solve different editing problems. Background removal isolates the main subject by deleting everything behind it. Object removal erases a selected distraction while keeping the surrounding scene intact. Choosing the right operation first produces a cleaner result and avoids unnecessary editing.
Quick decision guide
| If you need to… | Use | Expected result |
|---|---|---|
| Place a product on a new background | Background removal | An isolated subject, usually with transparency |
| Create a clean profile image or sticker | Background removal | The person or object without the original scene |
| Remove a passerby, cable, sign, or blemish | Object removal | The original scene with the selected area reconstructed |
| Delete unwanted words while preserving the design | Text removal | The text area rebuilt from nearby visual context |
| Process an animated GIF | GIF background removal | A background-free animation when the source is suitable |
The simplest test is this: Should the scene disappear, or should the scene stay? If the scene should disappear, remove the background. If it should stay, remove only the unwanted object.
What background removal does
Background removal separates a foreground subject from everything behind it. The output can be placed on a white studio background, a brand-colored panel, a marketplace template, a presentation, or another composition.
It is usually the right choice for:
- Product catalog images and ecommerce listings.
- Portraits, profile photos, and team headshots.
- Stickers, thumbnails, and social-media graphics.
- Logos or objects that need a transparent background.
- Reusing the same subject across several campaign designs.
ImageWise's Background Remover is designed for still images. For animation, use the dedicated GIF Background Remover, because preserving frames and timing is a different workflow from editing a single image.
Where background removal can struggle
Hair, fur, glass, smoke, motion blur, shadows, and reflective edges can make the foreground boundary ambiguous. Inspect the result at full size and check for halos, missing fine details, and accidental holes in the subject. A transparent result may also need a deliberate background color before it is published as a JPEG, because JPEG does not support transparency.
What object removal does
Object removal keeps the composition but replaces a selected area with pixels that fit the surrounding scene. Instead of cutting out the subject, it reconstructs the background behind a distraction.
It is usually the right choice for:
- Removing a passerby from a travel photo.
- Cleaning cables, dust, small signs, or clutter from a product scene.
- Removing a temporary prop from a room photograph.
- Repairing a small distracting region without changing the crop.
- Cleaning up an image before translation, resizing, or enhancement.
With the AI Object Remover, you mark the unwanted area with an editable mask and let the reconstruction model fill it. A tight, accurate mask generally preserves more of the original image than a large selection.
Where object removal can struggle
Large objects, repeated patterns, faces, hands, reflections, text-heavy interfaces, and objects that cover important geometry may require more than one attempt. If the removed object hides information that does not exist elsewhere in the image, no model can recover the exact original pixels; it can only generate a plausible replacement.
Text removal is a separate job
Text is technically an object, but it often sits on gradients, illustrations, packaging, or detailed interface elements. Use the AI Text Remover when the goal is to erase visible text while reconstructing the design underneath it. If you want to replace the wording in another language rather than remove it, use the AI Image Translator.
Do not describe text removal as redaction for confidential information. If an image contains sensitive data, remove or securely redact it before uploading or sharing the image. A visually reconstructed area is not a substitute for an approved privacy or document-redaction process.
Can you use both on the same image?
Yes, but use them as deliberate steps rather than assuming every tool shares one live editing document.
- Start with the operation that changes the largest part of the image.
- Download the first result.
- Open that result in the next ImageWise tool.
- Inspect the final image at full resolution before publishing.
For example, remove a distracting object while the original scene is still visible, download the result, and then remove the background to create a transparent product cutout. Reversing the order can make reconstruction harder because the context around the object has already disappeared.
What about batch processing?
Batch support depends on the specific ImageWise workflow. Some dedicated batch tools, such as the Batch Image Translator, support up to 20 images per session. That limit should not be interpreted as a promise that every background-removal, object-removal, or text-removal workflow processes 20 files at once.
For a large catalog, test representative images first, approve the edge and reconstruction quality, and then use a supported batch workflow where available. Consistent lighting and similar compositions usually produce more predictable results.
A practical quality checklist
Before downloading or publishing the result, check:
- Edges: Hair, fur, glass, product corners, and shadows look natural.
- Scene continuity: Lines, textures, reflections, and repeated patterns continue through a reconstructed area.
- Subject integrity: The tool did not alter logos, faces, fingers, labels, or product details that should remain.
- Resolution: The output is large enough for its final placement.
- Transparency: Transparent output is exported in a format such as PNG or WebP when needed.
- Accuracy: The edit does not misrepresent a product, property, person, or event.
You can prepare the approved result with the Image Resizer, Image Compressor, or Image Converter after the visual edit is complete.
Use removal tools responsibly
Only remove text, logos, watermarks, people, or objects from images you own or are authorized to edit. Do not use cleanup tools to conceal evidence, misrepresent a product, impersonate someone, or remove ownership information without permission. Read the AI Use Policy and Terms of Service before processing rights-sensitive material.
Frequently asked questions
Is background removal the same as changing the background?
No. Removal isolates the subject. Changing the background adds or generates a new scene after the original background has been removed.
Should I use object removal for a plain white product background?
Usually not. If everything except the product should disappear, background removal is faster and more consistent. Object removal is better when most of the scene must remain.
Will object removal restore the real background behind an object?
It generates a visually plausible reconstruction from nearby context. It cannot reveal exact details that were never visible in the source image.
Which tool should I use for a watermark?
Only remove a watermark when you own the underlying image or have explicit permission. Use the dedicated Watermark Remover for authorized cleanup and review the result carefully.
Final recommendation
Choose based on what must remain: use background removal when you need the subject alone, and object removal when you need the original scene without one distraction. For complex edits, process one clear step at a time, download the intermediate result, and verify both visual quality and editing rights before publication.
Remove an image background or clean up one unwanted object with the workflow that matches your goal.